Hey, bike buddies! Remember that time your pedals felt like they were welded on, and you just wanted to swap them for a quick upgrade? That was me last summer, staring at my old mountain bike in the garage, frustrated because the left pedal wouldn’t budge. I get it, figuring out how to remove bike pedals can seem tricky at first, especially with that sneaky reverse threading. But once I learned the basics, it was a breeze.
Let me share my experience step by step, so you can avoid my mistakes and get back on the trail fast. We’ll cover everything from tools like the pedal wrench to dealing with stuck bike pedals, all based on what worked for me with my Shimano setup. This guide is for anyone wondering about bike pedal removal, whether it’s for cleaning, travel, or changing bicycle pedals. Let’s roll!
Why I Needed to Remove My Bike Pedals in the First Place
Bikes are like old friends, they need care to stay smooth. For me, it started when my flat pedals got worn out after miles on rocky paths. I wanted to switch to clipless pedals for better grip. But removing them? I had no clue about the left bike pedal being reverse threaded. That’s key, folks, the right bike pedal follows “righty-tighty, lefty-loosey,” but the left one is the opposite to stop it from unscrewing while you ride.
Shimano or Crankbrothers pedals often have markings like “L” and “R” to help. If you’re packing your bike for a trip or just cleaning the crank arms. Knowing how to remove pedals from a bike saves time and hassle. Trust me, doing it wrong can strip threads and turn a simple job into a headache.
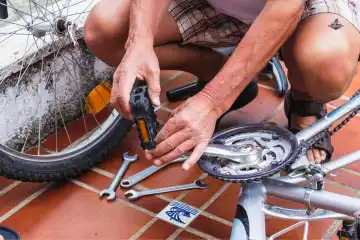
The Tools I Used for Bike Pedal Removal
Don’t start without the right gear, that’s lesson one from my fumble. I grabbed a 15mm pedal wrench from Park Tool, which fits the flats on most pedals. It’s thin and long for leverage. If your pedals have a hex socket, like many clipless ones, a 6mm or 8mm Allen key works great, insert it from the inside of the crank.
I also kept WD-40 handy for stuck spots, and some bike grease for later. No fancy stuff needed; a basic toolkit does it. GT85 spray or Muc-Off can sub for WD-40 if you prefer.
Pro tip: If you’re tool-less, a crescent wrench might work in a pinch, but it slips easy, better to invest in a proper pedal wrench to avoid damage.
Step 1: Prep Your Bike for Safe Pedal Removal
Safety first, right? I flipped my bike upside down on a stand, but you can lean it against a wall. Shift the chain to the big ring to protect your hands from teeth. Rotate the crank so the pedal you’re working on is at the 3 o’clock position for the right side or 9 o’clock for the left. This gives you room to push. I once skipped this and banged my knuckles, ouch! Clean any dirt off the threads too. This setup makes the whole bike pedal removal process smoother.
Step 2: Removing the Right Bike Pedal
Let’s start easy with the drive side. Face the right side of your bike. Slip the pedal wrench onto the flats between the pedal and crank arm. Or use the Allen key if that’s your fit. Now, turn the wrench counterclockwise, toward the back of the bike. It should loosen with a good push. I stood over the bike and used my body weight, holding the opposite crank for stability.
Once loose, spin it off by hand. My right pedal came right off, no sweat. If it’s tight, spray some WD-40 and wait a bit. Entities like Trek or Specialized bikes often have standard threads here.
Step 3: Tackling the Left Bike Pedal, Watch That Reverse Thread!
Ah, the tricky one. Turn your bike around to face the non-drive side. Position the crank at 9 o’clock. Insert your tool, wrench or Allen, and turn clockwise this time, again toward the back. That’s the reverse thread magic. I remember confusing this and tightening it more, big mistake! Push down with your foot for extra force if needed.
My left pedal was stubborn from rust, so I hit it with penetrating oil and let it sit overnight. Worked like a charm. Hold the brakes or strap the crank to the frame for leverage. Dura-Ace cranks might need care to avoid scratches.
What If Your Pedals Are Stuck? My Tips from Trial and Error
Stuck bike pedals? Been there. If basic turns don’t work, try heat from a hairdryer to expand the metal. Or use a breaker bar, a pipe over your wrench for more torque. I saw online tricks like drilling a hole in the spindle for grip, but that’s a last resort.
Take it to a local bike shop if you’re worried. Grease the threads next time to prevent this. For me, a vise grip on the flats did the trick once, but it risked stripping. Balance force with care; don’t ruin your crank arms.
Step 4: Clean and Check After Removal
With pedals off, wipe the threads on the crank. Look for damage, stripped spots mean trouble. I cleaned mine with a rag and reapplied grease before storing. This keeps things ready for new pedals. If changing bike pedals, match the spindle size, 9/16 inch is standard.
How to Install New Pedals, Since You’re Already There
While we’re at it, installing is reverse. Grease threads. Screw the right one clockwise, left counterclockwise. Tighten to about 30-40 Nm, firm but not overkill. I used a torque wrench for precision. Test with a short ride.
Common Mistakes I Made and How to Avoid Them
I over-tightened once, making removal hell. Always grease! Mix up threading? Use the “back off” rule, turn toward the rear. No stand? Prop the bike steady. For kids’ bikes or BMX, check for smaller tools.
Enjoy the Ride After Your Fix
Removing bike pedals opened up easy maintenance for me. From my mountain bike adventures to city commutes, it’s a skill worth having. Share your stories, did you battle a stuck one? Ride safe!
FAQs
Almost all bike pedals are fully removable. Only some very cheap or novelty bikes have pedals that cannot be easily taken off.
To unclip out of bike pedals, swing your heel away from the bike. This motion releases your foot from the cleat. Practice this until it feels automatic.
Start by letting the child use a balance bike. Once they can glide, encourage them to try short pedaling bursts. Offer lots of praise and support.
The right (drive side) pedal loosens counter-clockwise. The left (non-drive side) pedal loosens clockwise. Both pedals turn toward the back of the bike to loosen.
A kid’s bike with no pedals is called a balance bike. These bikes help children learn to balance before they learn to pedal. They are very popular.
You use a 15mm open-end pedal wrench to remove bike pedals. Some modern pedals also use an 8mm or 6mm hex key. Choose the right tool for your pedal type.
Use the correct wrench and turn the pedal axle toward the back of the bike. Follow the correct loosening direction for each side. It is the same process as an adult bike.
Use a long pedal wrench for extra leverage. Apply penetrating oil to the threads. Hit the wrench handle lightly with a soft hammer to shock the threads.
Yes, bikes without pedals are excellent for kids. They teach balancing skills early. This makes the transition to a pedal bike much easier later on.
First, select the right tool. Turn the wrench toward the back of the bike to loosen both sides. The right side is standard thread. The left side is reverse thread.

Co-Founder, Owner, and CEO of RoadHybridBike.
Ehatasamul Alom is a dedicated road hybrid bikes expert. With over 15 years of experience, he helps people find the perfect ride. He began his journey as a bike mechanic. He learned the ins and outs of every bike.
Ehatasamul Alom holds a Master’s degree in Mechanical Engineering from a top university, where he specialized in material science and bicycle kinematics. His master’s thesis focused on optimizing frame geometry for road hybrid bikes to improve rider comfort and efficiency.
Ehatasamul has an extensive professional background. He spent 10 years as a Senior Bike Designer at “Urban Cycles,” a leading bicycle manufacturer. In this role, he led the development of several award-winning road hybrid bikes, which are known for their durability and performance. He later served as the Head of Product Development at “Gear Up,” a company specializing in high-end cycling components. There, he developed innovative parts and accessories specifically for road hybrid bikes.
Over the years, Ehatasamul has become an authority on road hybrid bikes. He understands their design and function. His work focuses on making bikes easy to use. Ehatasamul believes everyone should enjoy cycling. He writes guides that are simple to read. His passion for road hybrid bikes is clear. His goal is to share his knowledge with everyone. He wants to see more people on two wheels. His advice is always practical and easy to follow.
Leave a Reply
You must be logged in to post a comment.