Hey, bike friends! If your brakes feel spongy or rub the wheel like an annoying itch, you’re not alone, I’ve been there, screeching to a halt mid-commute with a wince. “How to adjust bike brakes” is simpler than it seems: Start by checking pad wear, then tweak cable tension with barrel adjusters, center the caliper, and test lever pull.
For rim brakes, align pads to the rim; for discs, even out rotor spacing. I learned this the hard way after my first MTB ride, brakes grabbed unevenly, nearly sending me over the bars. Let me share my trial-and-error tales from garage tweaks to trail tests, covering brake pad adjustment, brake cable tension, disc brake alignment, and more.
We’ll hit the road, mountain, and kid bikes, with tips to keep rides safe and smooth. This guide draws from my fixes on a dozen bikes, blending quick wins with watch-outs, so you can dial in confidence without a shop visit.
Why Bother with Bike Brake Adjustment? My Wake-Up Call on a Rainy Ride
Brakes aren’t set-it-and-forget-it; they stretch cables and wear pads over time. Adjusting them sharpens stopping power, cuts squeaks, and prevents rubs that chew rims. I ignored mine once during a drizzle, lever pulled to the bar with a faint grip, turning a puddle into a slide.
Scary stuff! Proper adjustment means even contact, short lever travel (1-2 fingers), and no drag. Pros: Safer rides, longer pad life, that crisp “bite” feel. Cons: Over-tightening squeals; under-doing risks fumbles. For me, it’s peace of mind, especially with kids tagging along. If your brakes pull funny or whine, it’s time; a 15-minute tweak beats a crash.
Tools and Prep: What You Need to Adjust Bike Brakes Like a Pro
Grab basics: Allen keys (4-6mm for most), 10mm wrench for cables, pliers for stubborn bits. A bike stand helps (or flip the bike), plus a rag for clean rims. Check pads first, if worn past the groove line, swap ’em (cheap at $10-20).
My kit? Multi-tool with built-in wrenches, handy for trailside fixes. Safety note: Test in a lot, not traffic. Empathy: First time? Wobbly hands happen; breathe, go slow.
Step-by-Step: How to Adjust Rim Brakes on Road or Hybrid Bikes
Rim brakes squeeze the wheel rim, common on commuters. My road bike’s V-brakes rub if off, so here’s my flow:
- Wheel True Check: Spin the wheel; if it wobbles, center in dropouts by loosening QR skewer, wiggling, retightening. I press bars down for front, snaps it straight.
- Cable Tension Tune: Turn the barrel adjuster at the lever counterclockwise (lefty-loosey for tighten) half-turns. Test: Lever should grab in a 1-2cm pull. Too slack? Loosen cable bolt at caliper, pull taut, retighten.
- Pad Alignment: Loosen pad bolts; pads should hit rim clean, no rim top/bottom touch, slight toe-in (front edge first). Squeeze lever, recenter arms if uneven. My fix for squeaks? Sand rims lightly.
- Test and Toe: Roll forward, brake hard, rear lifts, front locks without skid. Adjust the spring balance if one arm lags.
Took me 10 minutes on my hybrid; now it stops like glue. Cons? Cables fray, inspect yearly.
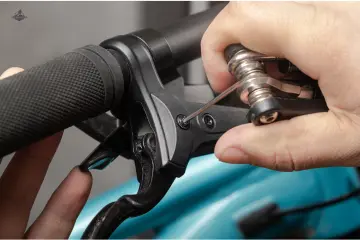
Tackling Disc Brake Adjustment: Centering Calipers for Clean Spins
Discs grab rotors, great for wet trails, but rubs plague new setups. My MTB’s hydraulic discs hummed until I dialed ’em:
- Rotor Inspect: Spin wheel; rub means misalignment. True bent rotors with a fork tool, gentle bends, baby steps.
- Caliper Position: Loosen mount bolts (or QR for thru-axle). Squeeze lever to pinch pads, retighten bolts while held, centers it auto. Zip-tie trick: Loop around caliper post, squeeze, zip to hold for two-hand torque.
- Pad Spacing: Even gaps on rotor sides (0.5-1mm). Adjust pistons with a plastic tire lever if sticky, push back gently.
- Bleed If Spongy: Air bubbles? Use the mineral oil kit for hydraulics; I skipped once, regretted the mushy feel.
My trial test? Silent spins, fierce grabs. Pros: All-weather bite. Cons: Messy oil bleeds, wear gloves.
Fixing Common Brake Issues: Squeaks, Rubs, and Spongy Levers from My Mishaps
Squeaks? Toe-in pads or clean rims, mine hushed after a wipe-down. Rubs? Wheel centering first; my kid’s bike shook from a bent dropout, quick QR fix. Spongy levers? Tension up or bleed air; e-bikes like my Rad need frequent cable locks.
Pulling to one side? Balance arms or check fork bend. I yanked a cable too hard once, snapped it mid-ride. Lesson: Half-turns, test often. Forums nailed my rubs with “white paper” views under calipers, spot the gap!
Brake Adjustment for Kids’ Bikes: Gentle Tweaks for Little Riders
Kids’ rigs need short pulls, my niece’s coaster brake rubbed the frame. Loosen caliper bolts, align pads parallel to rim (no tire touch), tension cables lightly. QR check crucial; loose ones flop wheels. Pros: Builds confidence. Cons: Tiny hands tire fast, keep travel minimal. Test by pushing backward; no roll means good.
When to Call a Pro: Limits of Home Brake Adjustments
DIY shines for basics, but bent rotors or hydraulic leaks? Shop time, $20-50 saves headaches. My con: Over-adjusting seized mine once; pro freed it quickly. If squeals persist or the lever bottoms out, get eyes on it.
Tips for Maintenance: Keeping Bike Brake Adjustment Fresh
Monthly spins: Test lever feel, pad wear. Lube cables yearly; replace if frayed. For discs, clean rotors with alcohol, no oils! My routine? Post-ride checks, caught a rub early. Pros: Extends life. Cons: Time sink, but worth it for safe spins.
Wrapping Up: Squeeze Safe and Ride Happy
Adjusting bike brakes turned my sketchy stops into sure things, less fear, more flow. From rim tweaks to disc centers, it’s empowering stuff. My tip? Celebrate that first clean grab. What’s your brake story, a squeak saver or rub rescue? Share below, happy wrenching!
FAQs
Accelerate to a moderate speed. Apply the brakes firmly and evenly to slow to a walking pace. Do not fully stop. Repeat this step about 20 times. This process transfers pad material to the rotor for better braking power.
First, make sure the wheel is sitting straight in the dropouts. To adjust the cable tension, turn the barrel adjusters on the lever or caliper. To adjust the brake pads, loosen the pad bolts and center the pads on the rim or rotor.
Yes, most of the time you can. Squeaking is often due to dirt or poor pad alignment. You can clean the pads and braking surface with rubbing alcohol. You can also adjust the brake pad position or “toe” the pads.
Check the brake pads for wear first. Adjust the brake pad position to make sure they hit the rim center. For cable brakes, tighten or loosen the cable with the barrel adjuster to set the lever pull distance.
No, never use WD-40 on your brake pads or rotors. It is an oil-based spray that will contaminate your brakes. This will cause them to squeak more and lose stopping power.
Squeaky brakes are usually caused by contamination from oil or dirt. They may also squeak if the pads are not aligned correctly. New brake pads need to be “bedded in” to stop the noise.
Clean the rotors and pads with a special brake cleaner. Apply brake silencer grease to the outside of the brake pads, away from the rotor. You can also lightly sand the rotor surface to remove any glaze.
On rim brakes, use the small spring tension screws on the caliper arms to center the pads. For disc brakes, loosen the caliper mounting bolts. Squeeze the brake lever, then re-tighten the bolts to center the caliper.
A squeak when pedaling is usually not the brakes. It often comes from dry or dirty parts in the drivetrain. Check and grease the bottom bracket, chain, pedals, and crank bolts.
For rim brakes, “toe-in” the pads. This means you angle them so the front edge hits the rim first. Clean the rims and pads well with rubbing alcohol. For disc brakes, clean the rotor and pads, and then properly bed them in.

Co-Founder, Owner, and CEO of RoadHybridBike.
Ehatasamul Alom is a dedicated road hybrid bikes expert. With over 15 years of experience, he helps people find the perfect ride. He began his journey as a bike mechanic. He learned the ins and outs of every bike.
Ehatasamul Alom holds a Master’s degree in Mechanical Engineering from a top university, where he specialized in material science and bicycle kinematics. His master’s thesis focused on optimizing frame geometry for road hybrid bikes to improve rider comfort and efficiency.
Ehatasamul has an extensive professional background. He spent 10 years as a Senior Bike Designer at “Urban Cycles,” a leading bicycle manufacturer. In this role, he led the development of several award-winning road hybrid bikes, which are known for their durability and performance. He later served as the Head of Product Development at “Gear Up,” a company specializing in high-end cycling components. There, he developed innovative parts and accessories specifically for road hybrid bikes.
Over the years, Ehatasamul has become an authority on road hybrid bikes. He understands their design and function. His work focuses on making bikes easy to use. Ehatasamul believes everyone should enjoy cycling. He writes guides that are simple to read. His passion for road hybrid bikes is clear. His goal is to share his knowledge with everyone. He wants to see more people on two wheels. His advice is always practical and easy to follow.
Leave a Reply
You must be logged in to post a comment.